Fix Blotchy Skin in Photoshop (Frequency Separation)
If your skin retouching keeps looking soft or plastic, frequency separation in Photoshop can help. It lets you clean up color and tone without wiping out pores and fine texture, as long as you set it up correctly and retouch the right layer.

A portrait like this is ideal for frequency separation in Configurator Reloaded 2.
Photo by Getty Images on Unsplash.
What to Fix on the High and Low Layers
Before you start, it helps to know what you should fix on each layer. High frequency holds fine detail like pores, hair, and sharp texture. Low frequency holds broader transitions like skin tone, color shifts, shadows, and highlights.
That separation is what makes the technique useful. Work on the low-frequency layer when you want to smooth blotchy color or uneven transitions. Work on the high-frequency layer when you need to clean up texture without smearing the skin.
How to Set Up Frequency Separation in Photoshop
The fastest way to understand frequency separation is to build it once by hand. Use this simple workflow:
- Duplicate your background or merged layer twice. Name the bottom copy "Low" and the top copy "High".
- Turn off the High layer. Select the Low layer and apply Gaussian Blur until the pores disappear but the main facial shapes stay readable. For many portraits, that lands somewhere around 5 to 15 pixels.
- Turn the High layer back on. Go to Image > Apply Image. Set Layer to "Low", Blending to "Subtract", Scale to 2, and Offset to 128 for the standard 8-bit setup.
- Set the High layer's blend mode to Linear Light. The two layers recombine to match the original image.
- Group both layers so you can toggle the effect on and off while retouching.
- Retouch on the Low layer for tone and color, and on the High layer for texture.
This setup is easy to get wrong when you are moving quickly. If you do frequency separation often, tools like Configurator Reloaded 2 can speed up the repetitive part with built-in Frequency Separation scripts, so you can start retouching without rebuilding the layer stack every time.
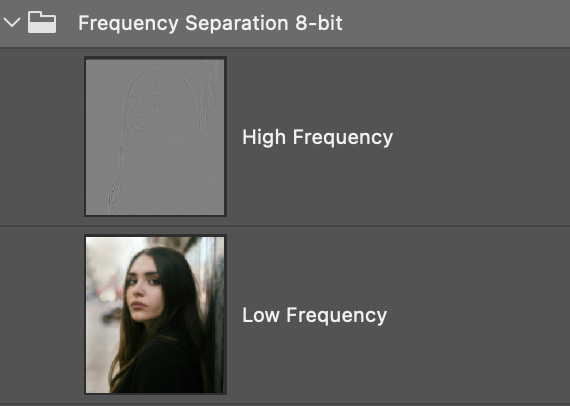
The Frequency Separation 8-bit script in the plugin creates the high-frequency and low-frequency layers automatically, so you can start retouching with one click.
Retouch the Right Layer, in the Right Order
Most bad frequency separation comes from editing the wrong layer, or pushing the effect too far. A safer workflow looks like this:
- Start on the Low layer. Use a soft brush, Healing Brush, or Mixer Brush carefully to even out blotchy tone and color transitions.
- Fix obvious texture issues on the High layer only after the tone looks better. Use the Healing Brush or Clone Stamp with restraint.
- Toggle the group on and off often. If the face starts looking airbrushed, back up and reduce your edits.
- Zoom out regularly. Frequency separation should improve the portrait at normal viewing size, not only at 300%.
The main rule is simple: tone and color on Low, texture on High. When you keep that boundary clear, the result stays much more natural.
Choose 8-bit or 16-bit Based on the Job
Frequency separation works in both 8-bit and 16-bit files, but you do not need the heavier setup for every portrait.
Use 8-bit when you are working on standard web images, social media portraits, or everyday client work where speed matters. It is lighter, faster, and usually enough.
Use 16-bit when the file already lives in 16-bit, when you expect heavier tonal edits, or when you are preparing high-end beauty work and large prints. The extra tonal information helps keep gradients smoother.
If your workflow is already 16-bit, stay there. If not, 8-bit is usually the practical choice. What matters most is not the bit depth, but whether your blur radius and retouching decisions fit the image.
Avoid These Common Frequency Separation Mistakes
- Blurring too much on the Low layer, which makes the skin look muddy before retouching even starts.
- Painting too aggressively on the High layer, which creates fake, repeated texture.
- Using frequency separation for everything. It works best for uneven tone, color shifts, and controlled texture cleanup, not for every blemish or every portrait.
- Forgetting to compare against the original. If the edited version looks obviously retouched, pull it back.
Conclusion
Frequency separation in Photoshop works best when you use it as a controlled cleanup tool, not a shortcut to blur skin. Set up the layers carefully, fix tone on Low, fix texture on High, and choose 8-bit or 16-bit based on the job in front of you.
If you want to skip the repetitive setup, Configurator Reloaded includes built-in 8-bit and 16-bit frequency separation scripts that you can trigger from a custom panel. You can try it free.